Access Denied
IMPORTANT! If you’re a store owner, please make sure you have Customer accounts enabled in your Store Admin, as you have customer based locks set up with EasyLockdown app. Enable Customer Accounts
Web Dashboard and Chromebook Control
Easily print from and control Robo C2 and Robo R2 with your Chromebook or any web browser
Step 1. Connect Robo C2 or Robo R2 to Wi-Fi.
a. First step is to connect your Robo C2 or Robo R2 to Wi-Fi, as well as your Chromebook to the same Wi-Fi network.
b. Select Utilities > Network > Configure Wi-Fi. Select your Wi-Fi network, and type in the password to connect.
Note: Ensure your Chromebook is connected to the same Wi-Fi network

Step 2. Find a file to print
a. Next, go to a 3D file marketplace on your computer and find a file you want to print.
b. Download the file.

Step 3. Find your IP address
a. Next step is to find your IP address which you will use in step 4.
b. Select Utilities > Network > Network Status > IP

Step 4. Access Web Dashboard
a. Open another browser tab and type in the unique IP address of your Robo C2 or Robo R2 from step 2.
b. You should be connected to your web dashboard immediately.

Step 5. Upload a file
a. To upload a file, click on the upload button on the left hand side of the dashboard.
b. Select the file that you just downloaded.

Step 6. Choose Slicing Profile
a. Once you upload a file, the slicing settings will pop up.
b. Choose a slicing profile (we recommend Low Quality).
c. Change the after slicing section to ‘begin printing.’
d. It will automatically send the file to your printer and begin printing.

Step 7. Monitoring Your Print
a. You can monitor your print in the upper left hand corner of the dashboard.
b. You can see things like which file is printing, and how much time is left until completion.

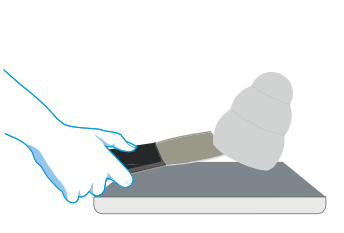
Step 8. Removing print
a. Once your print is complete on Robo R2, wait 5-10 minutes until the print bed cools and then safely remove it from the platform by using the included spatula to loosen it from the print bed. If you are on Robo C2, pop off the print on the print bed by twisting the bed back and forth to loosen up the print.
b. Enjoy your new 3D print!
Invalid password
Enter